


|
|
|
|
|
The main interface to AutoMenu is comprised of two consecutive events:
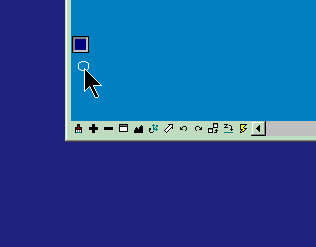 Fig 1.
  Fig 2.
When the cursor is in close proximity to view edge (or to snap point), a small activator square appears close to (or just beneath) the cursor (Fig 1.). Whenever you want to activate AutoMenu's popup menu, just let the cursor hover over the activator square (Fig 2.).
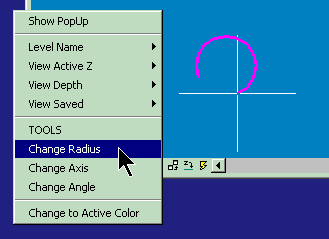 Fig 3.
If you let the cursor hover over activator square, a pull-down menu will open automatically with menu choices which relate to the element you have just snapped before. On the other hand, if you let the cursor stay outside of the activator square, it will disappear after a short while. Place cursor on the menu if you want it to stay (Fig 3.) or it will disappear after a fraction of a second as well.
Note, that menu content depend on what you have snapped to and what you have defined in AutoMenu settings file. AutoMenu settings file is located through INFOSNAP_AUTOMENU environment variable. An example file is delivered for your convenience and should be placed wherever INFOSNAP_AUTOMENU points to (check in Current State Monitor if in doubt and consult the 'Environment variables' chapter for more information about defining INFOSNAP_AUTOMENU). Make also sure that 'AutoMenu' is enabled in 'Settings-2'.
AutoMenu functionality can be divided into following two main areas:
Snap data recycling:
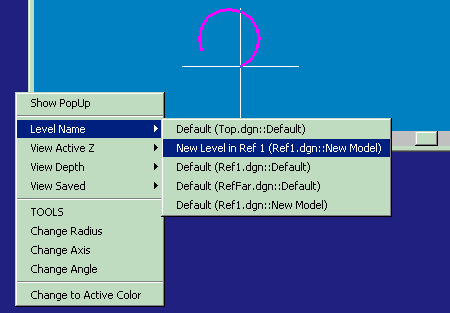 Fig 4.
Any Toggle can be assigned as data provider for AutoMenu. It is done in 'A.m.'-list in 'Toggles' tab. It is important that this Toggle is selected as Active (in 'All'-list) as well. As soon as you snap to something, associated data is inserted into AutoMenu under menu entry with the same name as its corresponding Toggle. If you have marked some listings in InfoSnap main popup as 'frozen' (pin icon), only data belonging to those 'frozen' lists will be passed to AutoMenu. Selecting this recycled data from AutoMenu will activate associated keyin and perform the desired action. You may want to experiment with Level Name as your selected Toggle and discover the new power of file/model navigation it reveals for you. Example of such output is shown in Fig 4.
Context-sensitive menus (and icon toolboxes!):
You can define any number of context-sensitive menus which will be displayed according to currently displayed element type (as usually shown in InfoSnap main popup balloon). This element type is normally retrieved by InfoSnap from the same element you most recently snapped to. Delivered sample settings file defines menus for Line, Text, Arc and a few other elements. You may want to add a bunch of your own menus. I am sure that you absolutely want to do that, especially when you look closer at delivered example entries called "TOOLS" and how they work. In Fig 3 and 4 we have snapped to an arc. AutoMenu shows us following choices: Change Radius, Change Axis and Change Angle. In addition to that, selecting TOOLS opens... Arcs Toolbox! How come?
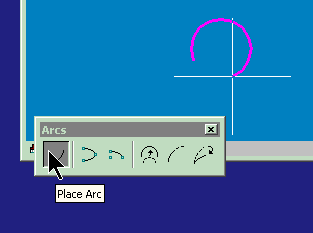 Fig 5.
Look closer at the following entry in delivered $InfoSnap-AutoMenu$.txt:
; ARC
;
16,TOOLS,DIALOG TOOLBOX ARC
16,Change Radius,MODIFY ARC RADIUS;DX=0,0
16,Change Axis,MODIFY AC AXIS;DX=0,0
16,Change Angle,MODIFY ARC ANGLE;DX=0,0
The first two lines are comments (i.e. begin with semicolon) and are disregarded by InfoSnap. The third row says: whenever snapped element is of type 16 (Arc) insert menu entry called TOOLS and execute keyin DIALOG TOOLBOX ARC whenever the TOOLS entry is selected by user.
And consequently, the next row says: whenever snapped element is, again, of type 16 (Arc) insert another menu entry called Change Radius and execute keyins: MODIFY ARC RADIUS and DX=0,0 whenever the Change Radius entry is selected by user.
And so forth. Pretty basic?
Controlling AutoMenu look-and-feel:
'Settings 2'-tab has two new controls for fine tuning AutoMenu:
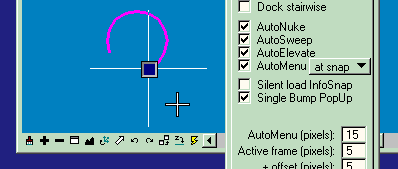 Fig 6.
Special use of SELVIEW keyin:
MicroStation's keyin "SELVIEW n" is used to issue a datapoint in a View "n" from within keyin command sequence.
InfoSnap however introduces an extended meaning to this keyin whenever "n" is defined as "0" (zero). In infoSnap's context keyin "SELVIEW 0" means either the view where the last snap has occured or where the AutoMenu has been activated.
In our context it always correspond to the view where the main pop-up balloon or AutoMenu has been recently shown (i.e. from which the associated keyins were issued). "SELVIEW 0" is part of default keyins associated with following new Toggles: "View Depth", "View Saved" and "View Active Z". So now you know a little more about how the AutoMenu magic is done ;-)
Default keyins for those Toggles are:
"View Depth" -> "DP=%;SELVIEW 0"
"View Active Z" -> "AZ=%;SELVIEW 0"
"View Saved" -> "VI=%;SELVIEW 0"
This makes applying View Depth retrieved from one view to several other views a breeze.
Reversing the order of MicroStation operation:
Example:
1. draw a few lines (plain lines, not SmartLines)
2. snap to one of them, but *do not* Accept with datapoint
3. activate AutoMenu (assuming delivered example settings file)
4. select 'Extend' from it
5. move your cursor back to close proximity of this line
Now you are in the middle of 'extend line' operation and your currently snapped line is a subject to it!
This is how you can use reversed order of operations: i.e. select element first and choose the operation later. I thought that you ought to know about this possibility.